【マイマップ】
ゲームの地図をjpgファイルとして用意すれば、地図上にマーカーを表示させ、一覧管理できるソフトです
地図画像ファイル名を「map.jpg」とすれば、画像の縦横サイズを自動で読み取り最適な大きさで表示します
「mymap.html」と同じ場所に地図画像「map.jpg」を置いて、「mymap.html」を起動すればブラウザで表示されます
アイデア・仕様:hideG
プログラム作成:Gemini(AI)
使用ソフト:Leaflet
色々な便利機能を入れています
どうぞお楽しみください
【注意】
本ソフトの使用はすべて自己責任です
本ソフトを使って生じたいかなる問題も私「hideG」には一切責任が無いものとします
本ソフトをダウンロードした時点でご了承いただいたものとします
Forza Horizon 6
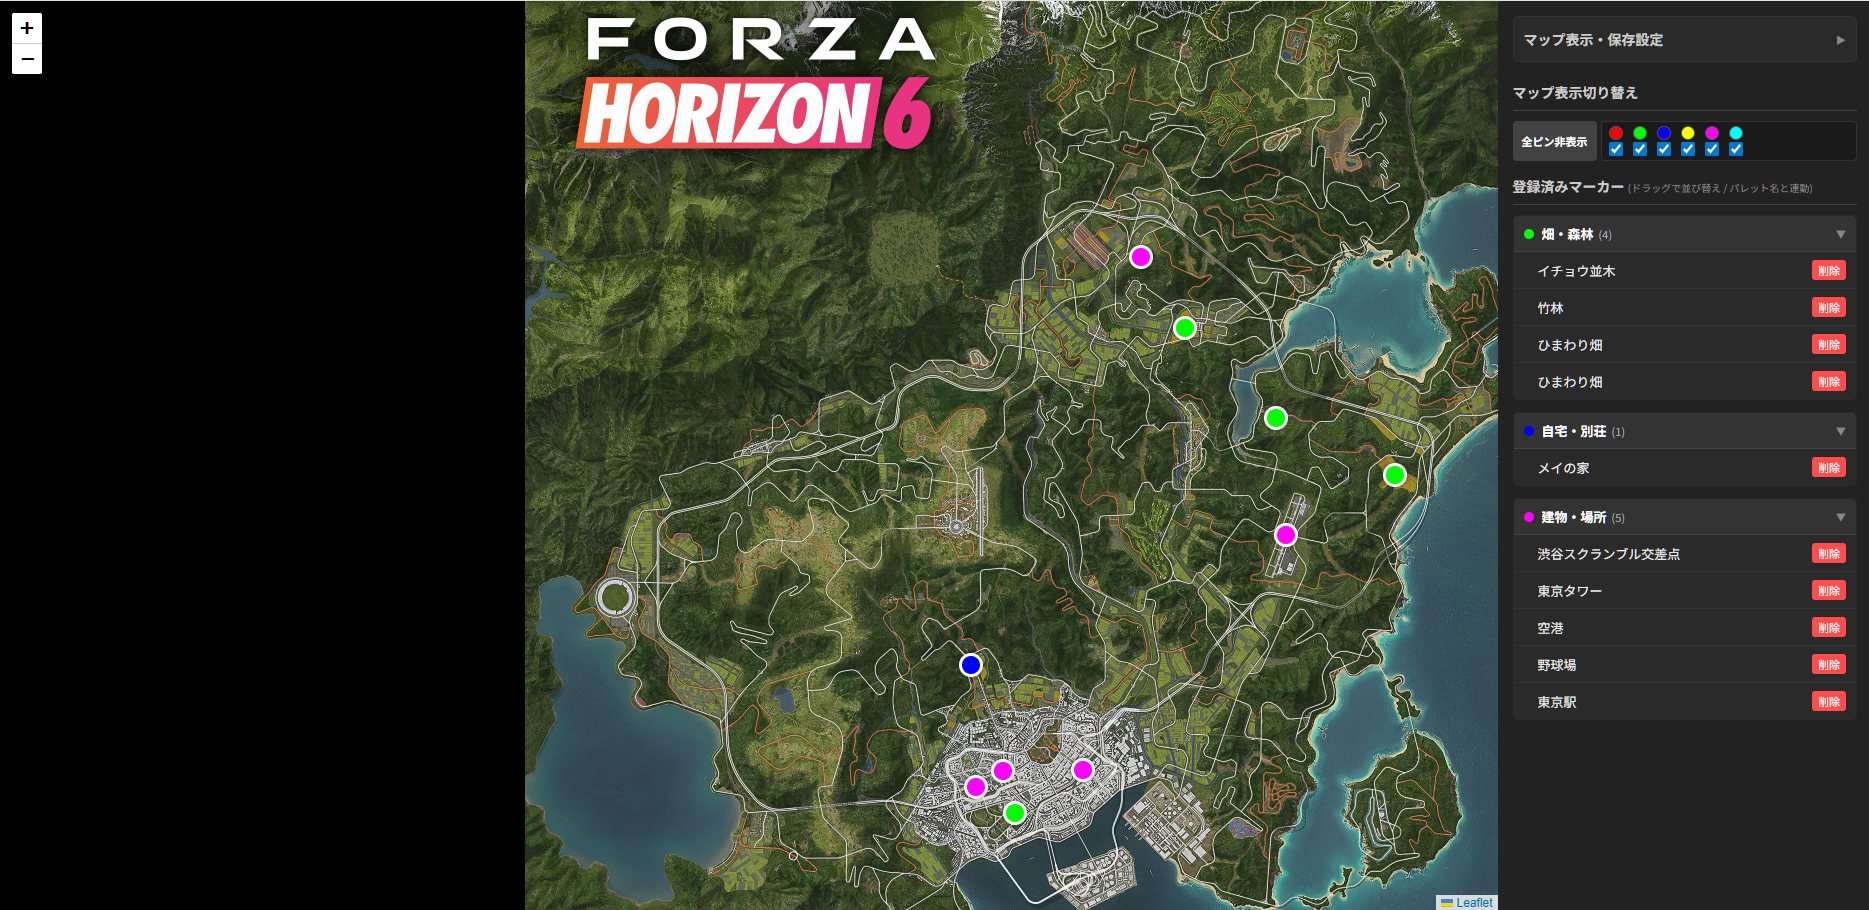
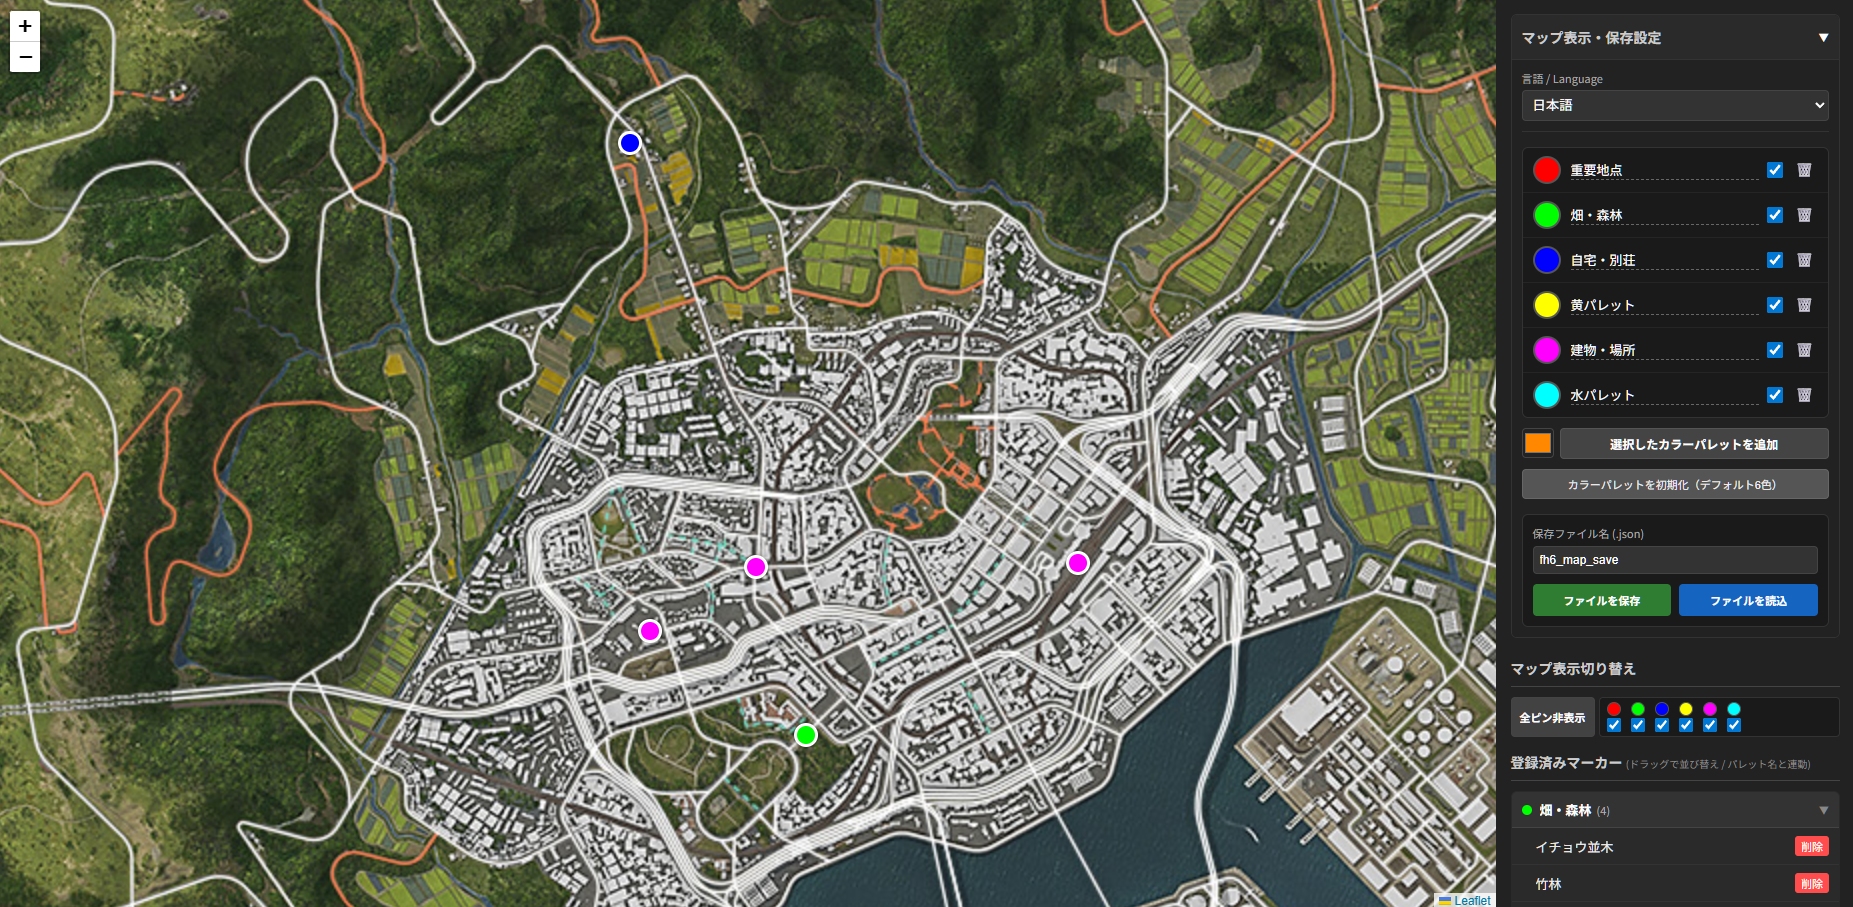
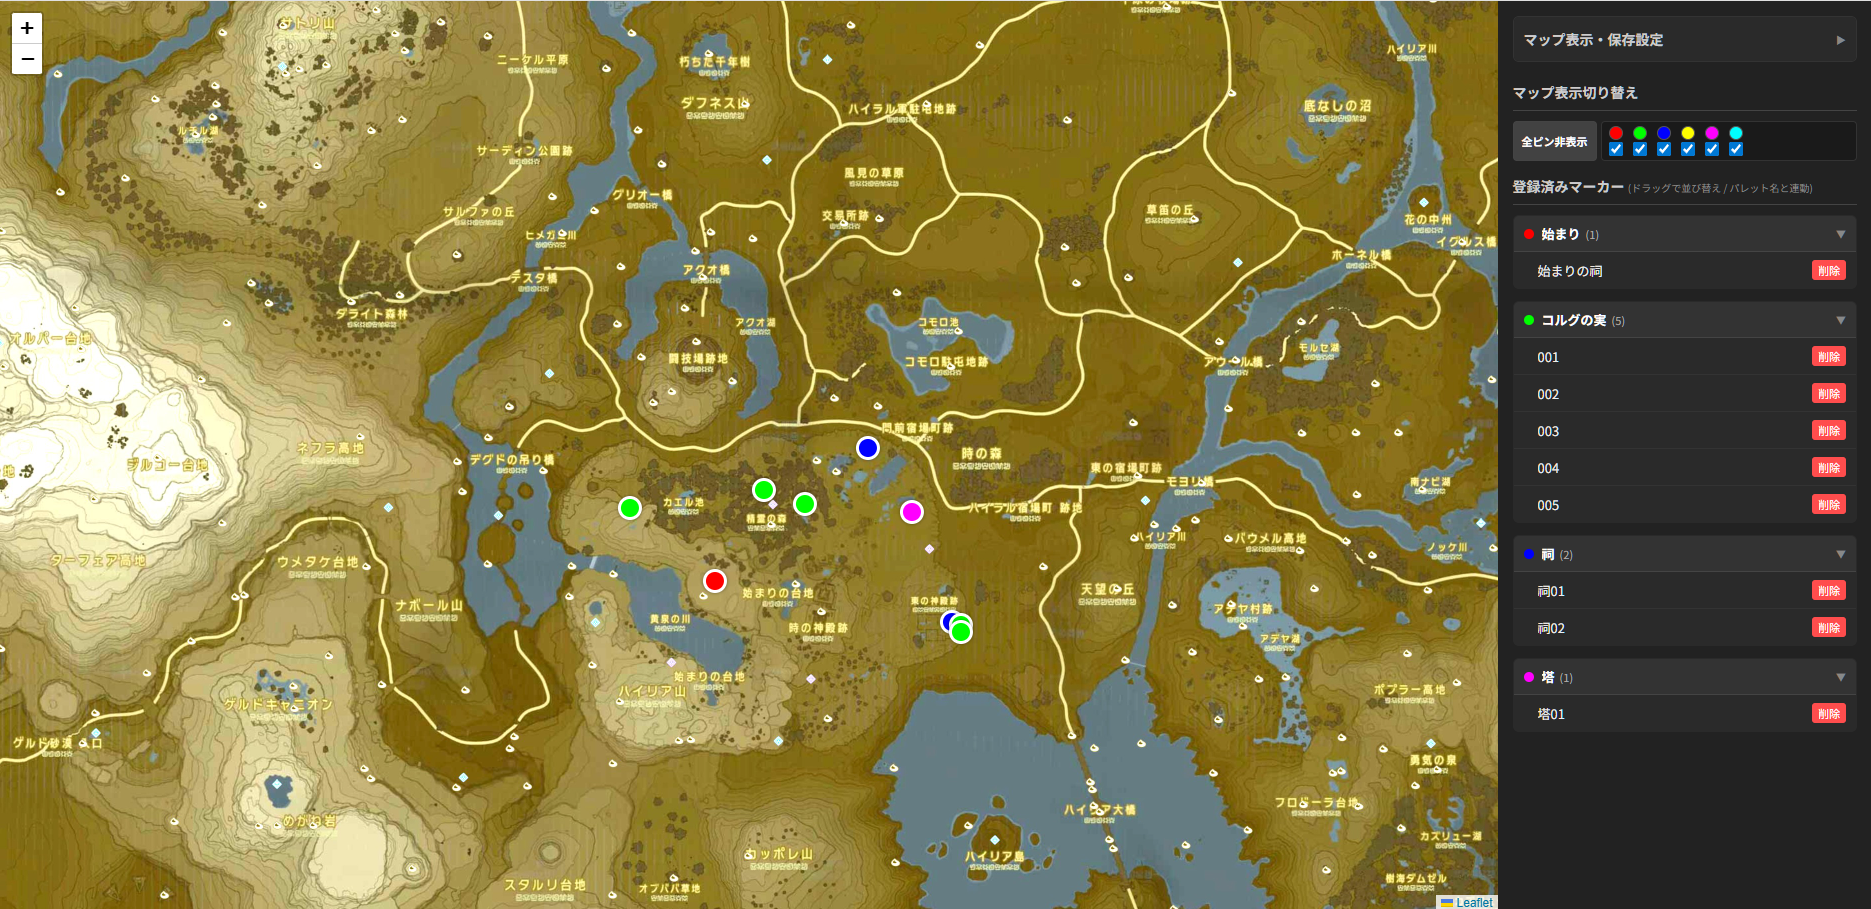
ゼルダの伝説 ブレスオブザワイルズ
【メニュー】
・マニュアル日本語
・Manual English
🗺️ 「マイマップ」 ユーザーマニュアル
本ツールは、ゲームのマップやフロアマップなどの画像ファイルを読み込み、ブラウザ上で自由にピン(マーカー)を立てて管理できるツールです。
📂 1. 準備と起動方法
-
必要なファイルを用意する
-
このツールの本体である
mymap.html
https://uu.getuploader.com/hideG_MSFS2020/download/219 -
マップとして表示したい画像ファイル
map.jpg(※必ず「map.jpg」というファイル名にしてください)
https://forza.net/news/forza-horizon-6-full-map-reveal
-
-
同じフォルダに入れる 上記の2つのファイルを、PC内の同じフォルダに置きます。
-
起動する
mymap.htmlをダブルクリックして、普段お使いのWebブラウザ(Chrome, Edge, Safariなど)で開きます。
🔰 2. 簡単な操作例(チュートリアル)
まずは、以下の手順で基本的な使い方を試してみてください。
【操作例1】マップに新しいピンを立てる
-
マップ(画像)上の、ピンを立てたい場所を ダブルクリック します。
-
小さな吹き出し(ポップアップ)が表示されます。
-
一番上の入力欄に「宝箱の位置」「ボス」など、マーカー名を入力します。
-
その下のプルダウンから、ピンの色(カラーパレット)を選びます。
-
「保存」ボタンを押すと、マップ上にピンが固定され、右側のリストにも追加されます!
【操作例2】立てたピンの位置を微調整する
-
マップ上に立てたピンをマウスでクリックしたままドラッグ(引っ張る)します。
-
好きな位置でドロップして離すと、ピンの位置が更新されます。
【操作例3】ピンを別のカテゴリ(色)に移動する
「赤パレット(敵)」に登録したピンを、「青パレット(味方)」に移動させたい場合の操作です。
-
画面右側の「登録済みマーカー」リストを見ます。
-
移動させたいピンの名前をクリックしたままドラッグします。
-
「青パレット」のリストのすき間に持っていき、ドロップします。
-
マップ上のピンの色も、自動的に青色に変わります!
⚙️ 3. 右側パネル(サイドバー)の機能一覧
画面右側のパネルでは、より詳しい設定や管理ができます。
① マップ表示・保存設定
-
言語 / Language 日本語と英語の表示を切り替えます。
-
カラーパレット(色とカテゴリ名)の変更
-
パレットの名前(「赤パレット」など)をクリックすると、好きな名前(「アイテム」「危険地帯」など)に変更できます。
-
🗑️(ゴミ箱)ボタンを押すと、そのパレットを削除できます。(所属していたピンは消えずに「未分類」に移動します)
-
-
新しいパレットの追加 カラーピッカー(四角い色のボタン)をクリックして好きな色を作り、「選択したカラーパレットを追加」を押すと、新しいカテゴリを作れます。
-
データの保存と読込(バックアップ)
-
【超重要】 ピンのデータはブラウザに自動保存されますが、ブラウザの履歴を消去するとデータも消えてしまいます。
-
「ファイルを保存」: 現在のピンの状態を
.jsonファイルとしてPCにダウンロード(バックアップ)します。 -
「ファイルを読込」: 過去に保存した
.jsonファイルを読み込んで、マップを復元します。
-
② マップ表示切り替え
-
全ピン非表示 / 表示 マップ上のすべてのピンを一時的に隠したり、再度表示したりできます。
-
色ごとの表示切り替え(クイックフィルター) 丸い色のアイコン、またはその横のチェックボックスをクリックすると、「赤いピンだけ隠す」「青いピンだけ表示する」といった絞り込みができます。
③ 登録済みマーカー
-
リストの開閉 カテゴリ名(例:「赤パレット ▼」)をクリックすると、中のリストを折りたたんでスッキリさせることができます。
-
マップの自動移動 リストの中にあるピンの名前をクリックすると、マップが自動的にそのピンがある場所へ移動(パン)し、吹き出しを開いてくれます。
-
ピンの削除 リストの右側にある「削除」ボタンを押すか、マップ上のピンをダブルクリックすると、そのピンを削除できます。
💡 4. 知っておくと便利な豆知識
-
マップの拡大・縮小 マウスのホイール(スクロール)を回すか、マップの左上にある
+-ボタンでマップを拡大・縮小できます。 -
画像サイズの自動調整について PCのローカル環境(ダブルクリックで直接開いた状態)では、ブラウザのセキュリティ設定により画像の縦横サイズを正確に読み取れないことがあります。その場合は「仮の正方形マップ」として表示されますが、ピンを立てる・保存するといった基本機能はすべて正常にご利用いただけます。
🗺️ "My Map" User Manual
This tool allows you to load image files, such as game maps or floor plans, and freely place and manage pins (markers) on them directly in your web browser.
📂 1. Preparation & Startup
-
Prepare the necessary files
-
The main tool file:
mymap.html
https://uu.getuploader.com/hideG_MSFS2020/download/219 -
The image file you want to display as the map:
map.jpg(Please ensure the image file is named exactly "map.jpg")
https://forza.net/news/forza-horizon-6-full-map-reveal
-
-
Place them in the same folder Put the two files mentioned above into the same folder on your PC.
-
Start the tool Double-click
mymap.htmlto open it in your regular web browser (Chrome, Edge, Safari, etc.).
🔰 2. Basic Operations (Tutorial)
Let's try out the basic features with the following steps.
[Example 1] Placing a new pin on the map
-
Double-click the location on the map (the image) where you want to place a pin.
-
A small popup will appear.
-
Enter a Marker Name in the top input field (e.g., "Treasure Chest", "Boss Location").
-
Select the pin's color (color palette) from the dropdown menu below it.
-
Click the "Save" button to lock the pin on the map and add it to the list on the right!
[Example 2] Adjusting a pin's position
-
Click and drag a pin you have already placed on the map.
-
Release it (drop) at your desired location to update its position.
[Example 3] Moving a pin to a different category (color)
For example, if you want to move a pin from the "Red Palette (Enemies)" to the "Blue Palette (Allies)".
-
Look at the "Registered Markers" list on the right side of the screen.
-
Click and drag the name of the pin you want to move.
-
Hover it over the space within the "Blue Palette" list and drop it.
-
The pin's color on the map will automatically change to blue!
⚙️ 3. Right Panel (Sidebar) Features
You can manage detailed settings and configurations in the right panel.
① Map Display & Save Settings
-
Language / 言語 Switches the interface language between English and Japanese.
-
Changing Color Palettes (Colors and Category Names)
-
Click a palette's name (e.g., "Red Palette") to rename it to something custom (e.g., "Items", "Danger Zones").
-
Click the
🗑️(Trash) button to delete that palette. (Pins belonging to it will not be deleted; they will simply be moved to "Uncategorized".)
-
-
Adding a New Palette Click the color picker (the square color button) to choose a color you like, then click "Add Selected Palette" to create a new category.
-
Saving and Loading Data (Backup)
-
[Very Important] Pin data is automatically saved in your browser. However, clearing your browser data/history will erase this data.
-
"Save File": Downloads (backs up) your current pins and settings as a
.jsonfile to your PC. -
"Load File": Loads a previously saved
.jsonfile to restore your map.
-
② Map Display Toggle
-
Hide All Pins / Show All Pins Temporarily hides or shows all pins on the map at once.
-
Display Toggle by Color (Quick Filter) Click the round color icon or the checkbox next to it to filter pins (e.g., "Hide only red pins" or "Show only blue pins").
③ Registered Markers
-
Collapsing / Expanding Lists Click a category name (e.g., "Red Palette ▼") to collapse or expand the list for a cleaner look.
-
Auto-Pan to Map Click a pin's name in the list, and the map will automatically move (pan) to that pin's location and open its popup window.
-
Deleting Pins Click the "Delete" button on the right side of the list, or simply double-click a pin on the map to delete it.
💡 4. Useful Tips
-
Zooming In and Out Use your mouse wheel to scroll, or click the
+and-buttons in the top left corner of the map to zoom in and out. -
About Automatic Image Size Adjustment In a local PC environment (when you open the HTML file directly by double-clicking), browser security settings might prevent the tool from accurately reading the original image's dimensions. In this case, it will be displayed as a "temporary square map," but all basic features like placing, dragging, and saving pins will still work perfectly.


コメント
最新を表示する
NG表示方式
NGID一覧